 GS1 Assistant - Help Document
Adding and Managing Your Company Prefix
In this article, you'll learn how to:
- Add a GS1 company prefix
- Choose the correct GTIN format
- Configure your range settings
- Edit an existing prefix
- Fix common prefix validation issues
Add a new GS1 Company prefix
- Go to: Company Prefix page
Here you’ll see:
- your connected prefixes (if you already have one)
- GTIN format
- remaining GTIN count
- validation status
Most merchants add their prefix manually.
Some GS1 organizations also support direct API connection. If your prefix is from a region with a supported API (such as GS1 Germany, GS1 Switzerland, GS1 Netherlands, or GS1 Brazil), you can connect with it via API.
Option A: Add your prefix manually
Step 1: Open the Add Prefix form
- Go to the Company Prefix page
- Click Add Prefix
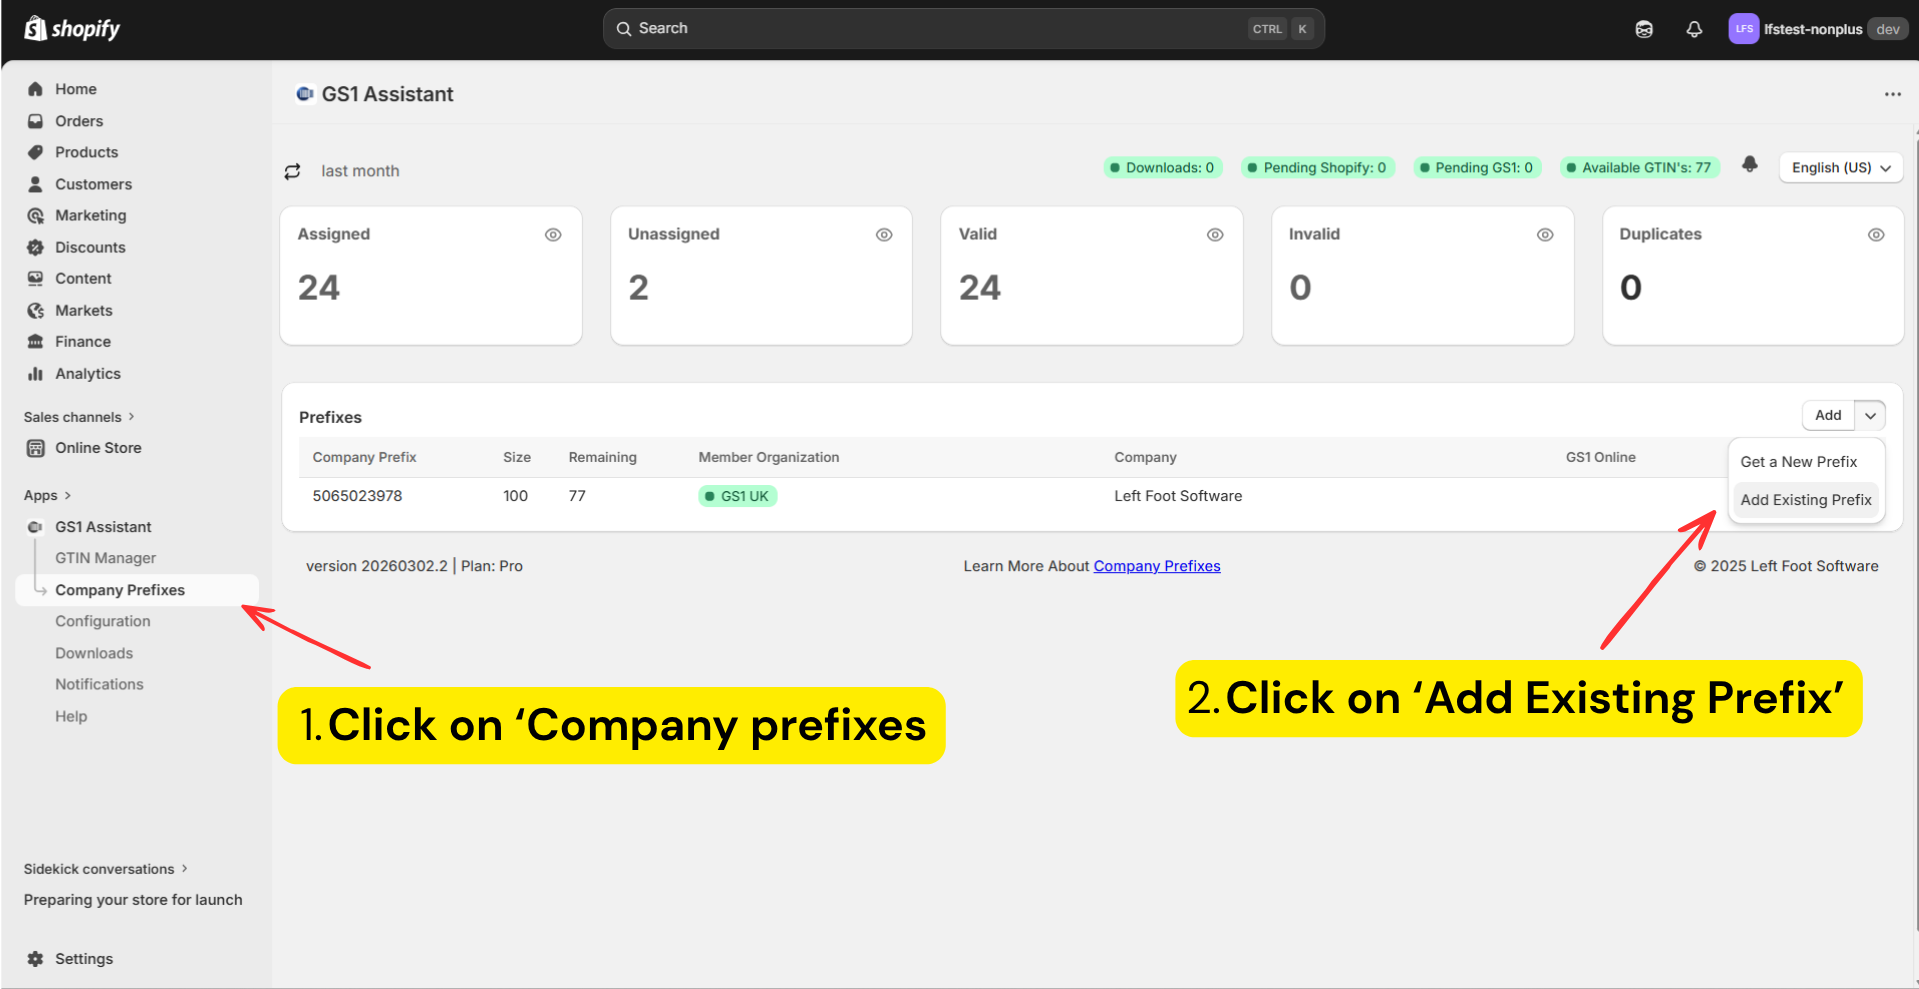
Step 2: Enter your company prefix
Enter your prefix using numbers only without any spaces or dashes.

For GS1 US users:
- If your prefix appears as:
614141, enter it as:0614141
Add the leading zero for validation.
You can also add your Company name
You can also enter your company name and if it matches with the name in GS1, it will show in the list.

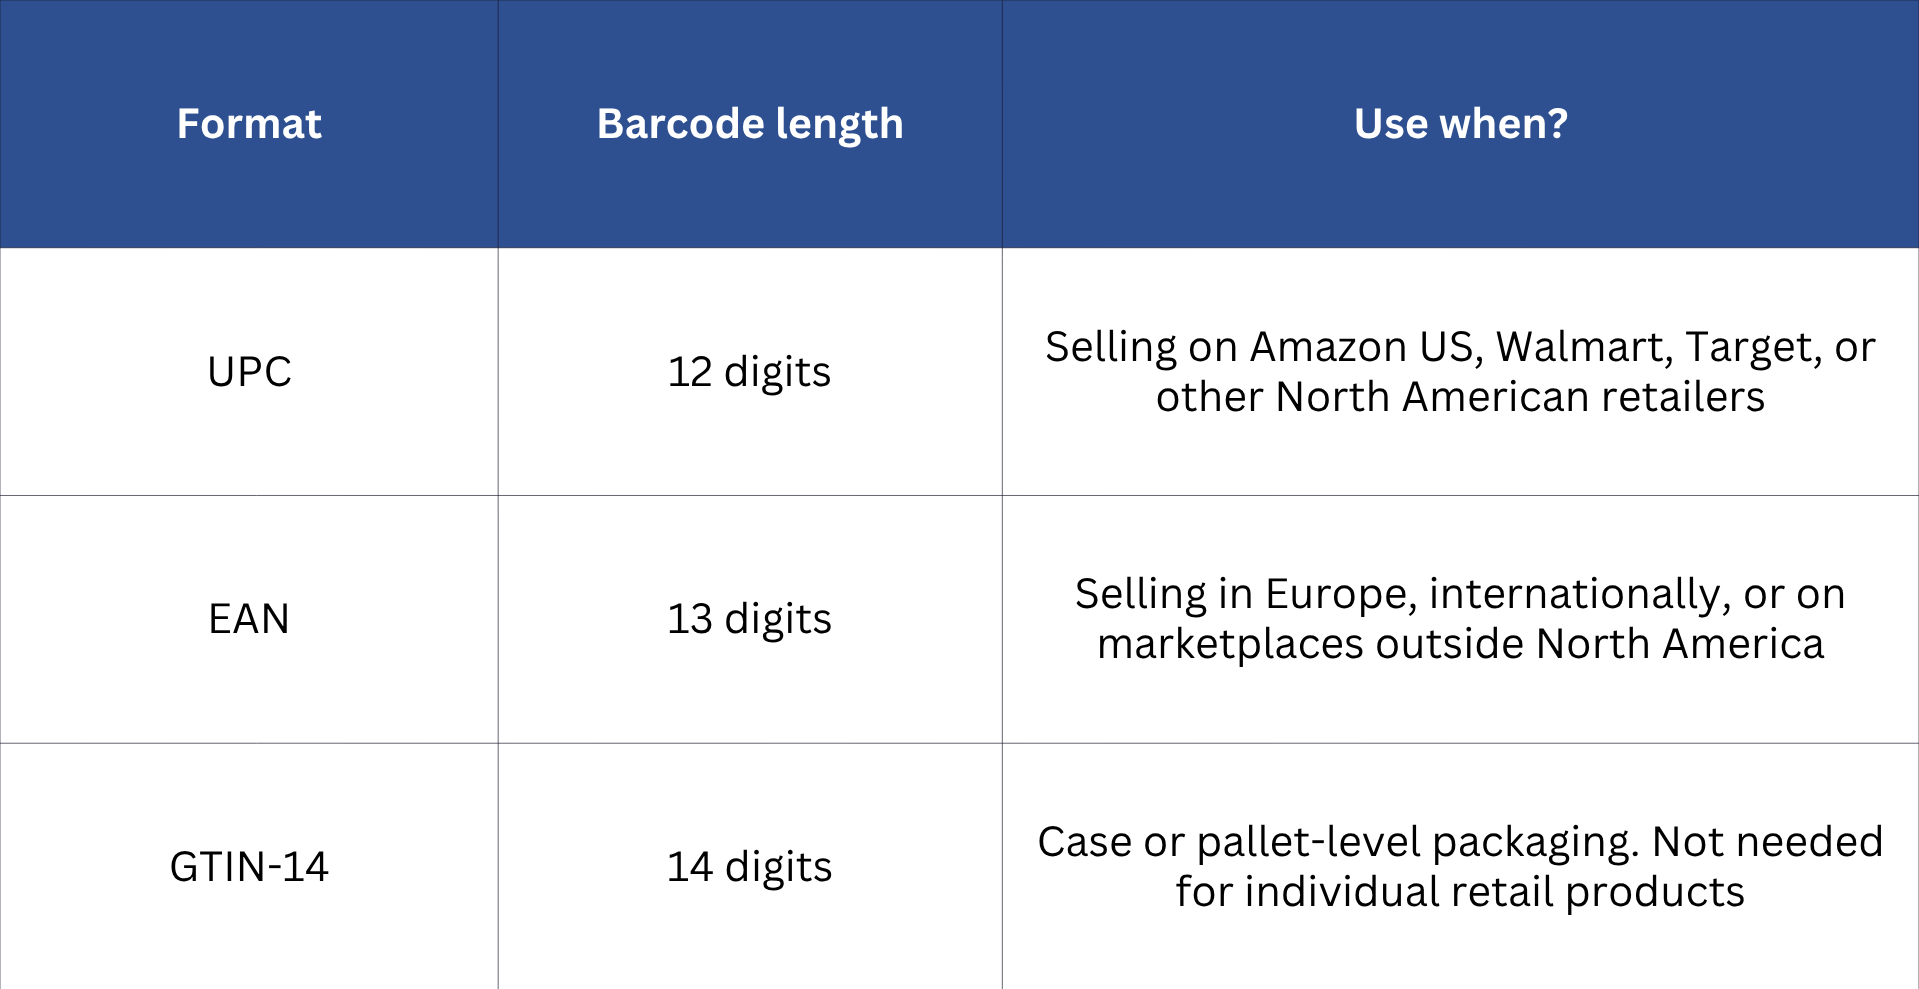
Step 3: Choose your GTIN format
The format you choose determines which format we save in the Barcode field in Shopify.

Step 4: Configure Your Assignment Range(s)
Assignment ranges control which GTINs GS1 Assistant can use from your company prefix.
You can create one or more ranges depending on how you want to allocate GTINs.
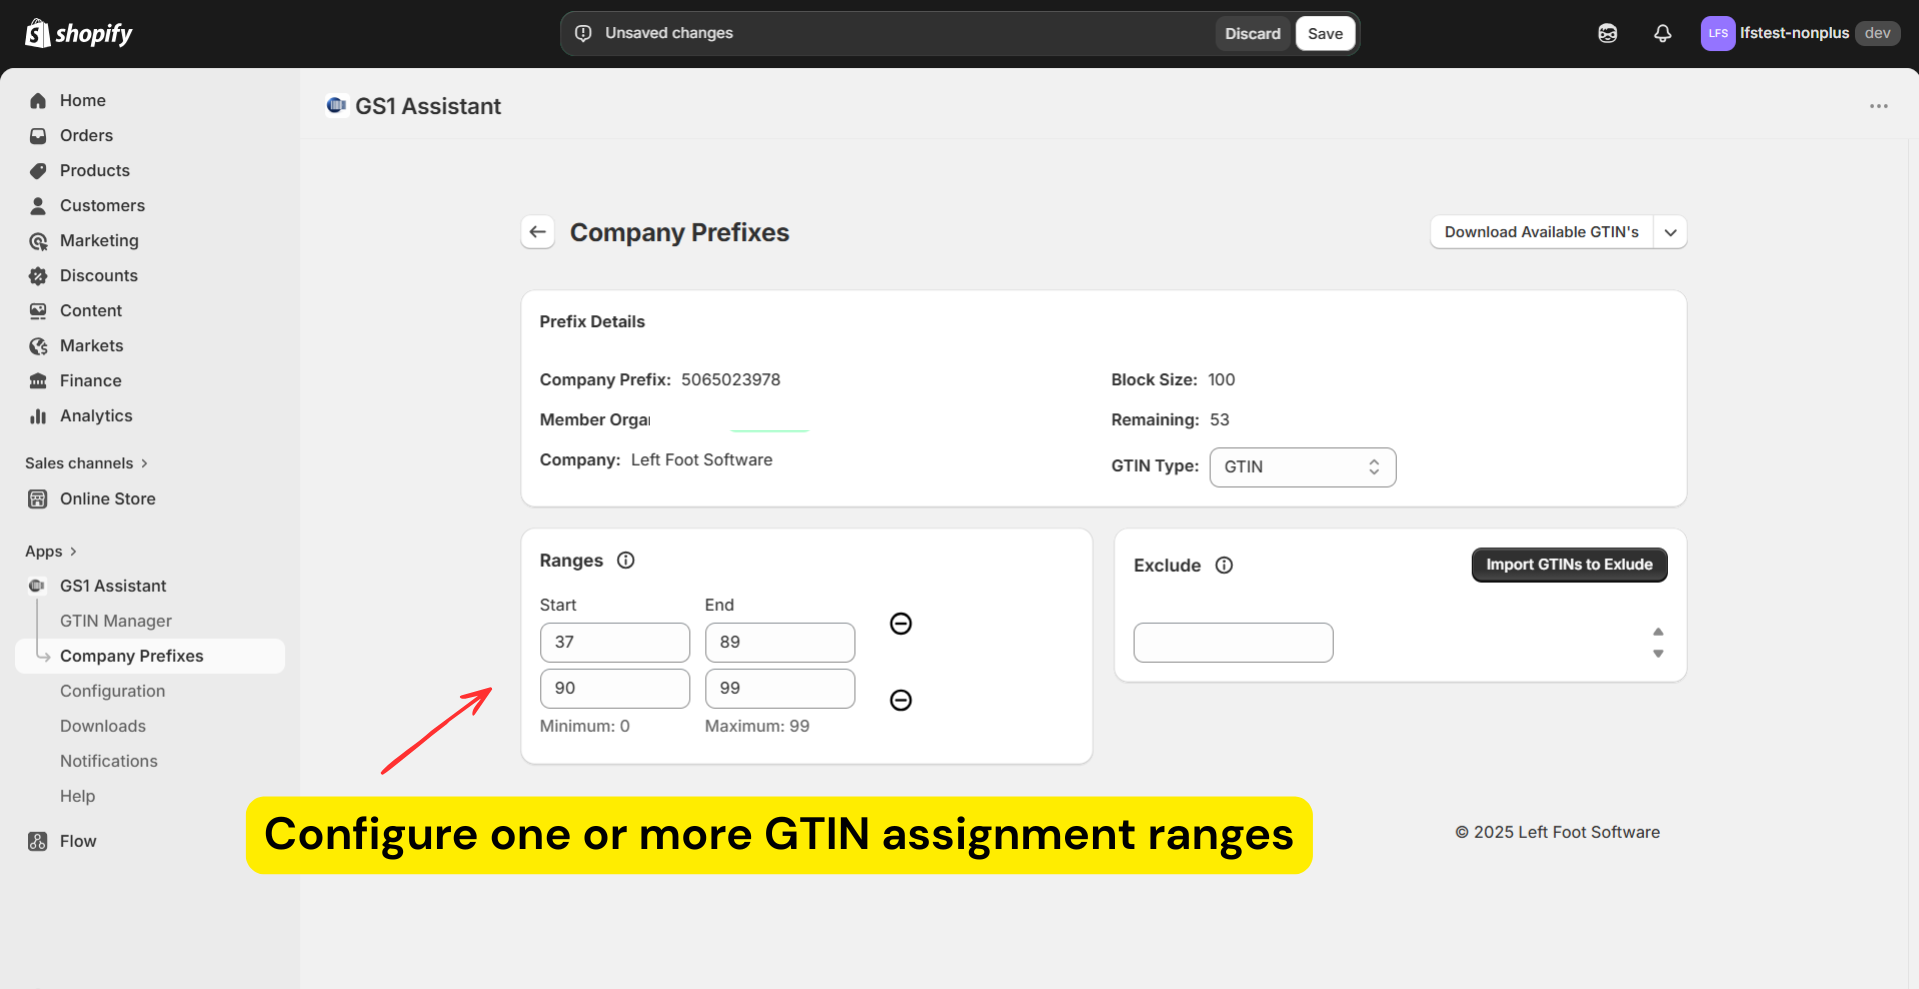
For a new prefix, create a range that starts at 0.
- If you've already assigned GTINs manually, start the range from the first unused position.
- You can create multiple ranges if you want to reserve parts of your GTIN block for different products, stores, or future use.
Example:
- Already assigned GTIN positions 0–36 manually
- Create a range starting at 37
Example range:
- Start: 37
- End: 99
Step 5: Save your prefix
Click Save.
Your prefix will appear in the prefix list with a status indicator.
Prefix status indicators
The status column in the prefix list tells you whether each prefix is validated and how it’s connected.

What to do if the prefix shows “Invalid”?
This is usually caused by one of these:
- Missing leading zero for GS1 US prefixes
- Recently renewed membership
- Incorrect prefix number
- Recently purchased prefix
- The prefix is registered with a different company
If your prefix was purchased recently:
- Wait 24-48 hours
- Click “Refresh”
- Try again
If the issue continues, contact support.
Option B: Connect via API
Some GS1 organizations support direct API connection, including:
- GS1 Germany
- GS1 Switzerland
- GS1 Netherlands
- GS1 Brazil
If available, the connection option appears inside the prefix settings.
API connection is optional. Manual setup provides the same GTIN assignment functionality. For supported GS1 organizations, API connection may require additional verification to confirm ownership of the company prefix.
Can I edit an existing prefix?
No, you cannot edit:
- prefix number
- block size
These are fixed after saving.
You can only edit:
- Start of Range
- End of Range

How Assignment Ranges Work
Assignment ranges control which GTIN positions GS1 Assistant can use from your company prefix.
You can create one or more ranges depending on how you want to allocate GTINs.
If no restrictions are needed, you can use a single range that covers your entire GTIN block.
You may choose to create multiple ranges when:
- reserving GTINs for future products
- splitting GTINs across multiple stores
- separating product lines or brands
- managing different teams or workflows
Example:
| Range | Purpose |
|---|---|
| 0–499 | Main product catalog |
| 500-699 | Future products |
| 700-999 | Second Shopify store |
Managing multiple prefixes
If your business owns multiple GS1 prefixes, you can add all of them to GS1 Assistant.
Each prefix:
- keeps its own range settings
- tracks its own GTIN count
- assigns GTINs independently
Read next: How to Avoid Duplicate GTIN Assignments (Setting Your Start Range)